

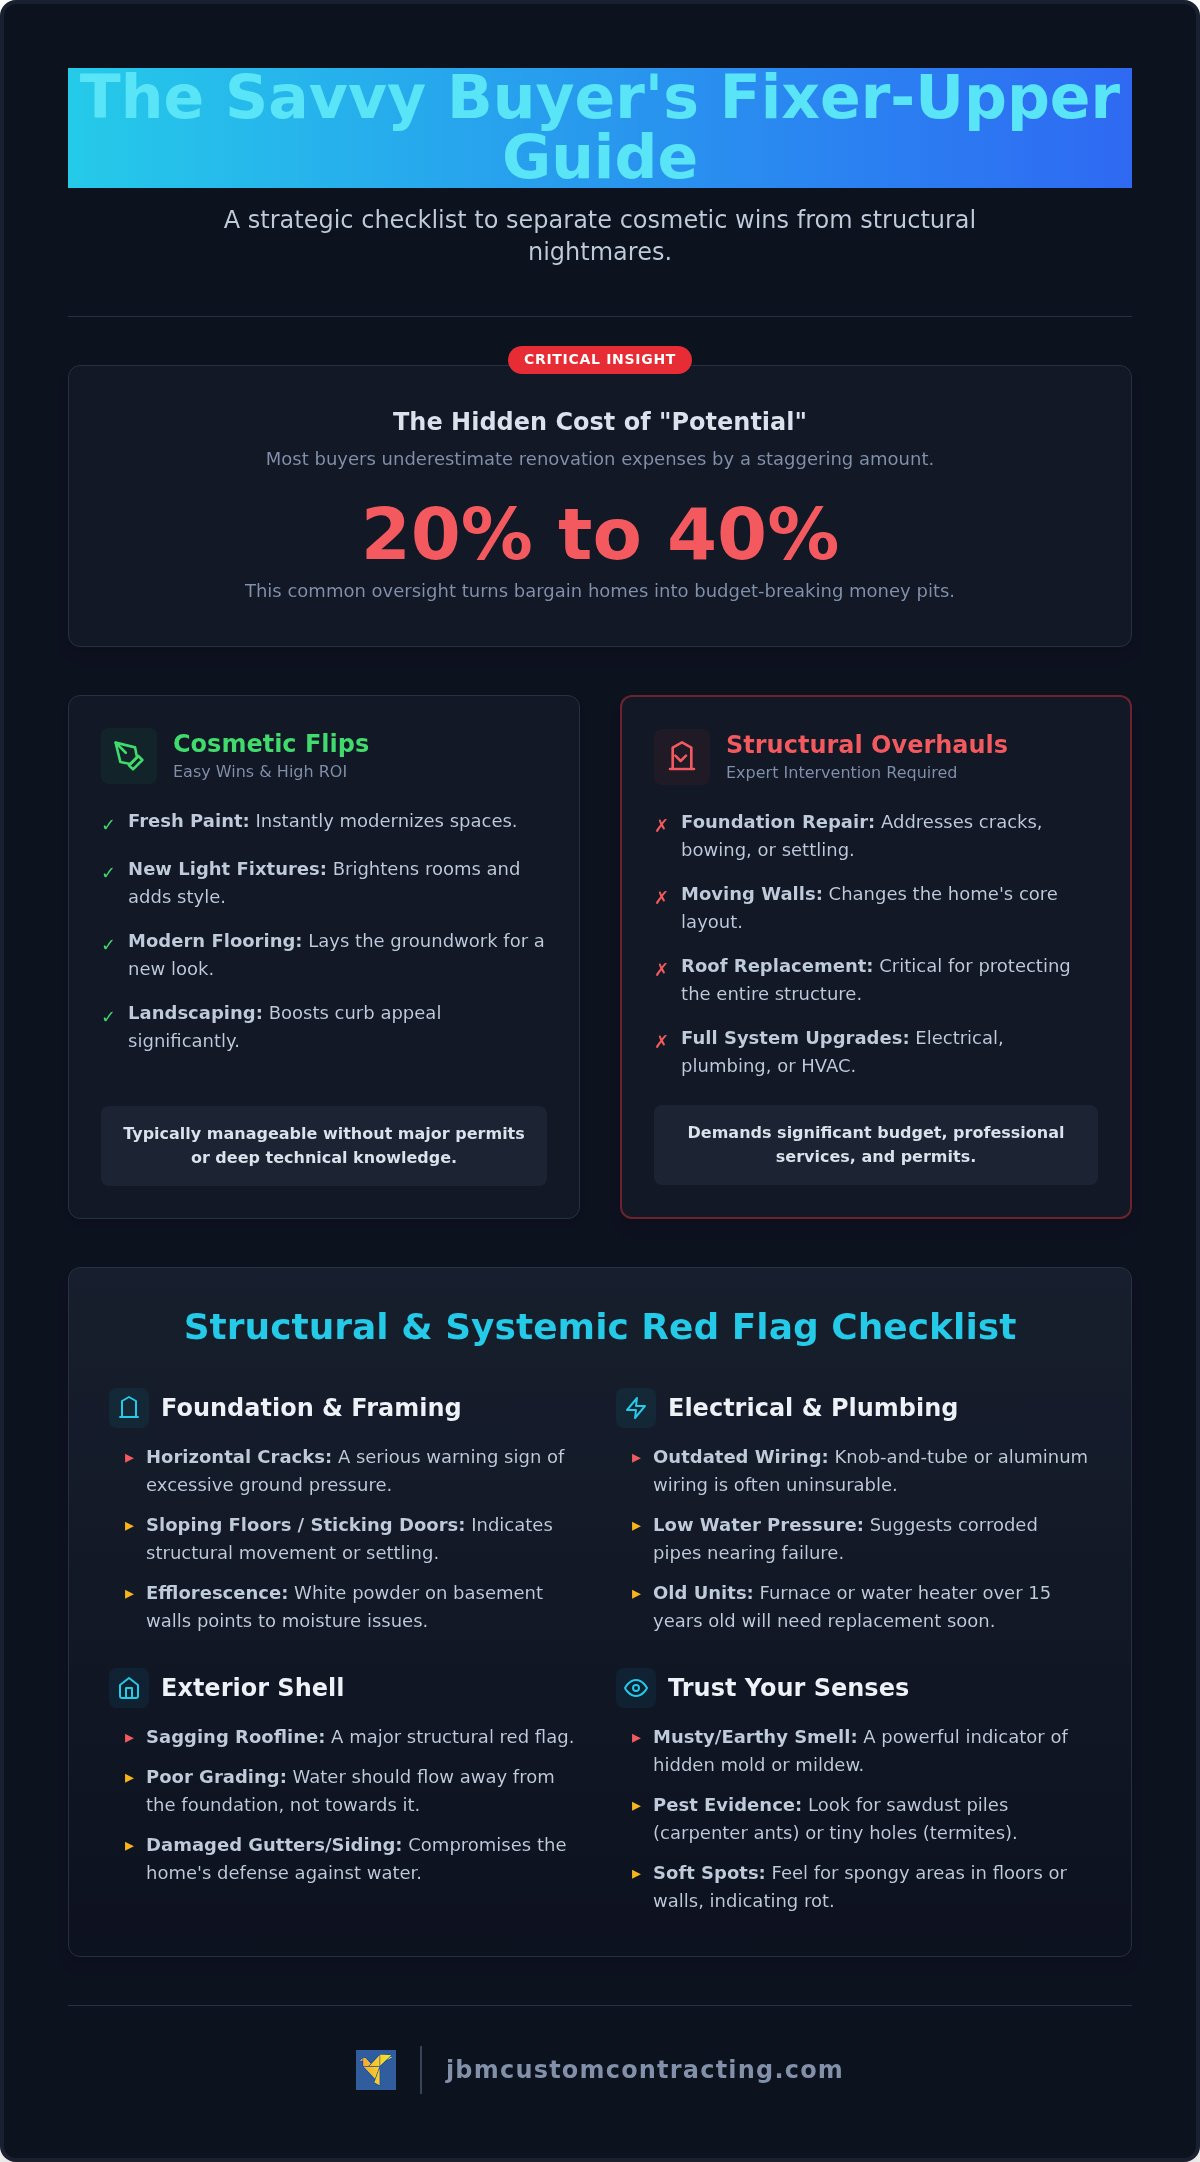
Did you know that most homeowners underestimate their renovation expenses by 20% to 40%? It's a common mistake that often happens when buyers don't use a structured fixer upper inspection checklist during their initial walkthrough. You want a property with potential, but the fear of hidden structural costs can make the entire process feel overwhelming. We understand that you need to know exactly what you're getting into before you commit your hard-earned savings to a new project.
This guide provides a professional-grade tool to help you separate simple cosmetic fixes from the structural nightmares that require expert intervention. We'll give you the confidence to evaluate a property like a pro, helping you estimate renovation budgets with much better accuracy. You'll learn how to spot the red flags that mean it's time to walk away and when to call in a professional for the heavy lifting. We've organized this information into a clear, printable-style format for your next walkthrough, covering everything from foundation stability to exterior maintenance. By the time you finish reading, you'll have the tools to make an informed, fearless decision on your next investment.
The Fixer-Upper Foundation: Why a Strategic Checklist is Your Best Investment
Buying a fixer-upper is an exercise in professional discipline. A low price tag often blinds buyers to expensive realities, leading to "renovation amnesia" where the excitement of a deal outweighs the logic of a budget. You need a fixer upper inspection checklist to act as your objective partner during every walkthrough. It helps you look past the "potential" and see the property as it truly is. Most buyers fall in love with a layout or a view and ignore the damp smell in the basement. This is a psychological trap. A checklist keeps you grounded. It ensures you check the age of the roof and the condition of the gutters before you start picking out kitchen tiles. Using a checklist moves you from an emotional mindset to a contractor’s eye view. This perspective is vital for spotting where you can actually make money versus where you'll just be spending it.
Cosmetic Flips vs. Structural Overhauls
Cosmetic projects are the "easy wins" for any property owner. These include tasks like applying fresh paint, installing new light fixtures, or laying down modern flooring. These updates are manageable and offer a high return on investment without requiring major permits or deep technical knowledge. Structural overhauls are a different story. These involve moving walls, replacing foundations, or upgrading entire electrical systems. These "gut jobs" often require professional demolition services to clear the way for a fresh start safely. If you see sagging rooflines, major foundation cracks, or evidence of long-term water damage, you're looking at a structural overhaul that demands a significant budget and professional expertise.
The True Cost of a 'Bargain'
A bargain isn't a bargain if it doubles your budget within the first month. Hidden issues like mold, rot, or outdated plumbing can quickly drain your cash reserves. You must factor in professional fees, local permits, and specialized labor before making an offer. While a comprehensive home inspection is a necessary step before closing, your personal fixer upper inspection checklist helps you decide whether to even reach that stage. It identifies the "deal breakers" early so you don't waste money on inspections for a lost cause. You should also consider the cost of junk removal to clear out debris left by previous owners. In the context of Vancouver Island real estate, a money pit is a property where the total cost of essential structural repairs and hazardous material removal exceeds the home's eventual market value increase.
Evaluating the 'Bones': Structural and Systemic Red Flags
Don't let a fresh coat of paint or a charming vintage fireplace distract you from the property's skeletal health. While cosmetic updates are exciting, the "bones" of the house are what determine whether your investment stays profitable. A thorough professional assessment is essential before you sign any papers, but your initial fixer upper inspection checklist should help you identify major red flags immediately. Start by looking at the foundation. Vertical cracks are often just signs of natural settling, but horizontal cracks are a serious warning. These suggest that the ground is putting too much pressure on the walls, which could lead to a total collapse if not addressed by experts. You should also use a DIY home inspection checklist to track smaller issues like the age of the furnace or water heater. If these units are over 15 years old, you'll need to budget for replacements sooner rather than later.
Foundation and Framing Essentials
Walk through every room and pay attention to how the house feels under your feet. Sloping floors or doors that stick in their frames are classic indicators of structural movement. In the basement, look for efflorescence, which is a white, powdery substance on concrete walls. This indicates recurring moisture issues that can weaken the structure over time. If you notice significant bowing or dampness, you might need professional JBM Concrete Services to stabilize the area before beginning any interior renovations. These issues are rarely "easy fixes" and often require specialized equipment to repair safely.
Mechanical Systems Deep Dive
Electrical and plumbing systems are the veins and arteries of the home. Open the electrical panel to see if it's organized and labeled correctly. Look for outdated knob-and-tube or aluminum wiring, which many insurance companies won't cover without a full upgrade. You should also test the water pressure by turning on multiple taps at once. Low pressure or brown tint in the water often points to corroded pipes that are ready to fail. [INSERT YOUTUBE VIDEO: How to Spot a Failing Electrical Panel and Outdated Wiring]. Checking these systems early in your fixer upper inspection checklist prevents you from being surprised by a five-figure utility overhaul after you've already started the demo.
Finally, trust your senses. The "sniff test" is a powerful tool for identifying hidden problems. A musty, earthy smell usually means mold is growing behind the drywall or under the floorboards. Similarly, look for small piles of sawdust or tiny holes in wooden beams, which are clear signs of pest infestations like carpenter ants or termites. Catching these systemic issues during your first walkthrough allows you to adjust your offer or walk away before the property becomes a financial burden. If the bones aren't solid, no amount of cosmetic work will save the deal.
Exterior Integrity: From Rooflines to Foundation Grading
While the internal bones are critical, the exterior shell is your property's first line of defense. On Vancouver Island, our unique climate of heavy rainfall and high humidity demands extra scrutiny. An essential home inspection checklist must account for local environmental factors that can turn a bargain into a money pit. You need to look up at the roofline and down at the soil to ensure water is being managed correctly. Neglecting the exterior during your walkthrough can lead to expensive surprises once you start the renovation process.
The Moss and Gutter Connection
In regions like Nanaimo and Lantzville, moss isn't just an aesthetic issue. It's a structural threat. Moss acts like a sponge, holding moisture against shingles and causing them to degrade prematurely. This often leads to hidden leaks that rot the roof deck from the inside out. Utilizing professional Moss Removal Services ensures your roof remains efficient and safe from moisture-driven decay. Similarly, clogged gutters are the primary cause of basement flooding in our area. When water can't flow through the downspouts, it spills over the sides and pools at the foundation. Over time, this constant moisture causes concrete to crack and wood to rot. Scheduling Professional Gutter Cleaning is a reliable way to ensure water diversion is handled safely and efficiently.
Siding and Exterior Surfaces
Evaluating the condition of siding is a vital part of your fixer upper inspection checklist. Whether the home has stucco, vinyl, or wood siding, you need to check for failing paint or soft spots that indicate wood rot. These issues are often hidden under years of dirt and grime. Utilizing professional House Washing in Nanaimo provides a thorough and reliable way to reveal hidden damage, making it easier to spot cracks or decay before you finalize your renovation budget. This simple step can save you from replacing entire sections of siding that only needed a professional cleaning and minor repairs.
Finally, look at the grading around the house. The ground should slope away from the structure at a rate of at least one inch per foot for the first six feet. If the yard slopes toward the house, you're looking at a major drainage project. Poor grading forces the foundation to act as a dam, eventually leading to structural failure. We often see properties where overgrown gardens or old retaining walls have altered the natural flow of water. Ensuring water moves away from the building is a non-negotiable step in maintaining property value. This might require professional yard care or even concrete work to redirect runoff safely and protect your investment.
The Cleanup and Prep: Junk Removal and Strategic Demolition
A successful renovation begins with a clean slate. Many buyers overlook the sheer volume of debris found in a neglected property. You cannot accurately complete your fixer upper inspection checklist when stacks of old furniture or piles of construction waste block your view of the subfloor and wall plates. Clearing the clutter is more than just a cleaning task; it's a strategic step in property evaluation. It reveals hidden water damage, pest entry points, and the true condition of the structural framing. Without a clear space, you're merely guessing at the scale of the work required behind the scenes.
Clearing the Path for Progress
Full-scale debris removal is essential for a safe and efficient project. When you clear a room completely, you can finally see if the floor joists are sagging or if there's rot along the baseboards. For properties on Central Vancouver Island, this often means dealing with years of accumulated household items and yard waste. Utilizing professional Central Vancouver Island Junk Removal ensures that this heavy lifting is handled safely and responsibly. If you're unsure where to start, our Junk Removal Services Guide offers a step-by-step approach to reclaiming your space before the real work begins.
Small Demolition Planning
Once the junk is gone, you can identify which structures need to be removed to make way for your vision. This might include tearing down a rotting shed, removing an unsafe old deck, or taking out interior partitions to create an open-concept layout. It's vital to identify non-load-bearing walls before you start swinging a sledgehammer. Professional Demolition Services provide the expertise needed to strip a property down to its good bones without compromising its integrity. You should also consult our Hiring Demolition Contractors Guide to understand the permits and safety protocols required for these tasks. [IMAGE SUGGESTION: A high-resolution photo of a professionally cleared interior room with exposed studs and a clean subfloor, ready for new construction].
Site preparation also involves the safe handling of hazardous materials. Older homes often contain lead paint or asbestos in flooring and insulation. Budgeting for professional disposal is a non-negotiable part of your project planning. Trying to handle these materials yourself can lead to health risks and legal complications. By investing in professional site prep, you ensure that your renovation starts on a solid, safe, and clean foundation. This stage is about more than just destruction; it's about preparing the environment for a high-quality build that will last for decades.
Request a professional demolition and junk removal assessment for your project
Turning Your Vision into Reality: Professional Renovation Planning
Once you've cleared the debris and finished your initial walkthrough, you face the most critical decision of the project: deciding what to DIY and what to outsource. It's tempting to try and save money by doing everything yourself, but structural changes or specialized concrete work require a level of precision that only a professional can provide. Using your fixer upper inspection checklist, prioritize repairs that protect the home's integrity first. Cosmetic updates like painting or installing trim are great for DIYers, but anything involving the "big five" systems should be handled by a certified team. A professional walkthrough before you close the deal acts as a final safety net, ensuring your budget accounts for every necessary repair.
Hiring the Right Team in Nanaimo and Beyond
Vetting local contractors is about more than just checking prices. You need a partner who understands the specific building codes in areas like Nanaimo, Cowichan, and Lantzville. Always verify that your contractor is fully insured and carries the proper certifications for the work they perform. During a consultation, ask direct questions about their experience with Island-specific challenges, such as high-moisture drainage or moss management. A transparent contractor will provide a clear breakdown of the demolition and construction phases, helping you manage your cash flow effectively. If you're ready to move from planning to action, you can Contact JBM for a Consultation to discuss your project's specific needs.
The Final Walkthrough Checklist Summary
Before you commit to the purchase, recap these five essential areas from your fixer upper inspection checklist: foundation stability, roof and gutter health, mechanical system capacity, exterior grading, and interior structural bones. It's helpful to set a firm "walk away" limit before you start negotiations. If the estimated repair costs for these core systems exceed your contingency budget by more than 20%, the deal might no longer be profitable. Consistent, reliable property maintenance is the foundation of long-term ROI, preventing small issues from turning into the "money pits" we've discussed throughout this guide. By following a phased plan, you can tackle the heavy lifting first, ensuring your dream home is built on a safe and professional foundation.
Secure Your Investment and Start Your Transformation
Mastering the fixer upper inspection checklist is the difference between a profitable investment and a financial disaster. You now have the tools to look past the surface and evaluate a property's true potential. By focusing on structural integrity and mechanical systems before picking out finishes, you ensure your budget stays on track. High-quality site preparation, including strategic demolition and thorough junk removal, provides the clean slate needed for professional results. These early steps are non-negotiable for anyone looking to build long-term value.
As fully insured and certified professionals, we take the stress out of the heavy lifting. We serve Nanaimo, Ladysmith, and the Cowichan Valley with expert small demolition and renovation prep services that set your project up for success from day one. You've done the research and have a solid plan in place. Now it's time to turn that vision into a reality. We're ready to help you handle the difficult jobs correctly so you can focus on building your dream home with total confidence.
Frequently Asked Questions
What are the biggest red flags when looking at a fixer-upper?
Major red flags include horizontal foundation cracks, outdated knob-and-tube wiring, and consistent moisture or efflorescence in the basement. You should also watch for sagging rooflines and evidence of active pest infestations like carpenter ants. These issues are often extremely costly and require professional intervention to fix safely. Using a detailed fixer upper inspection checklist helps you identify these problems during your first walkthrough so you don't waste money on a property that isn't structurally sound.
Is it worth buying a house with foundation issues?
Buying a house with foundation issues is only worth it if the purchase price is low enough to cover the repair costs while maintaining your profit margin. Some foundation repairs are simple, like filling settling cracks, while others require major concrete work or structural lifting. You must get a professional assessment to understand the full scope of the work before closing. If the repair costs exceed the home's potential market value increase, it's usually better to walk away.
How much should I budget for unexpected repairs in a fixer-upper?
You should budget at least 20% to 40% more than your initial renovation estimates to cover unexpected repairs. Research shows that most homeowners underestimate their project expenses by this amount. Fixer-uppers often hide problems behind walls or under floorboards that you won't see until demolition begins. Having a solid contingency fund ensures that a surprise plumbing leak or electrical issue doesn't stall your entire project or drain your savings before the work is finished.
Do I need a permit for small interior demolitions on Vancouver Island?
Permit requirements vary by municipality, so you must check with the building department in Nanaimo, Lantzville, or your specific local area. Generally, you don't need a permit for removing non-structural elements like cabinets or old flooring. However, if you're removing walls, changing the floor plan, or affecting plumbing and electrical systems, a permit is almost always required. Working without necessary permits can lead to significant fines and legal issues when you eventually sell the property.
Can I do my own junk removal to save money on a renovation?
You can handle your own junk removal, but it often takes much longer and costs more in disposal fees and truck rentals than people expect. Professional junk removal services handle all the heavy lifting and ensure materials are disposed of safely and legally at local facilities. This is especially important for large-scale renovations where the volume of debris is high. Outsourcing this task allows you to focus your energy on the actual renovation and construction work.
How do I tell if a wall is load-bearing before I start demolition?
You can often identify a load-bearing wall by checking the direction of the ceiling joists in the attic or basement. If the joists run perpendicular to the wall, it's likely load-bearing. Walls located in the center of the house or those that are thicker than average are also common indicators. Never start a demolition project without a professional inspection. Removing a load-bearing wall without proper support can cause your ceilings to sag or lead to a structural collapse.
What is the difference between power washing and soft washing for an old house?
Power washing uses high-pressure water to blast away dirt from hard surfaces like concrete driveways or stone retaining walls. Soft washing uses low pressure combined with specialized cleaning solutions to safely remove moss and algae from delicate surfaces like vinyl siding or roof shingles. For an old house, soft washing is usually the safer choice to prevent water from being forced behind the siding or damaging the integrity of aging materials during your exterior property maintenance.