


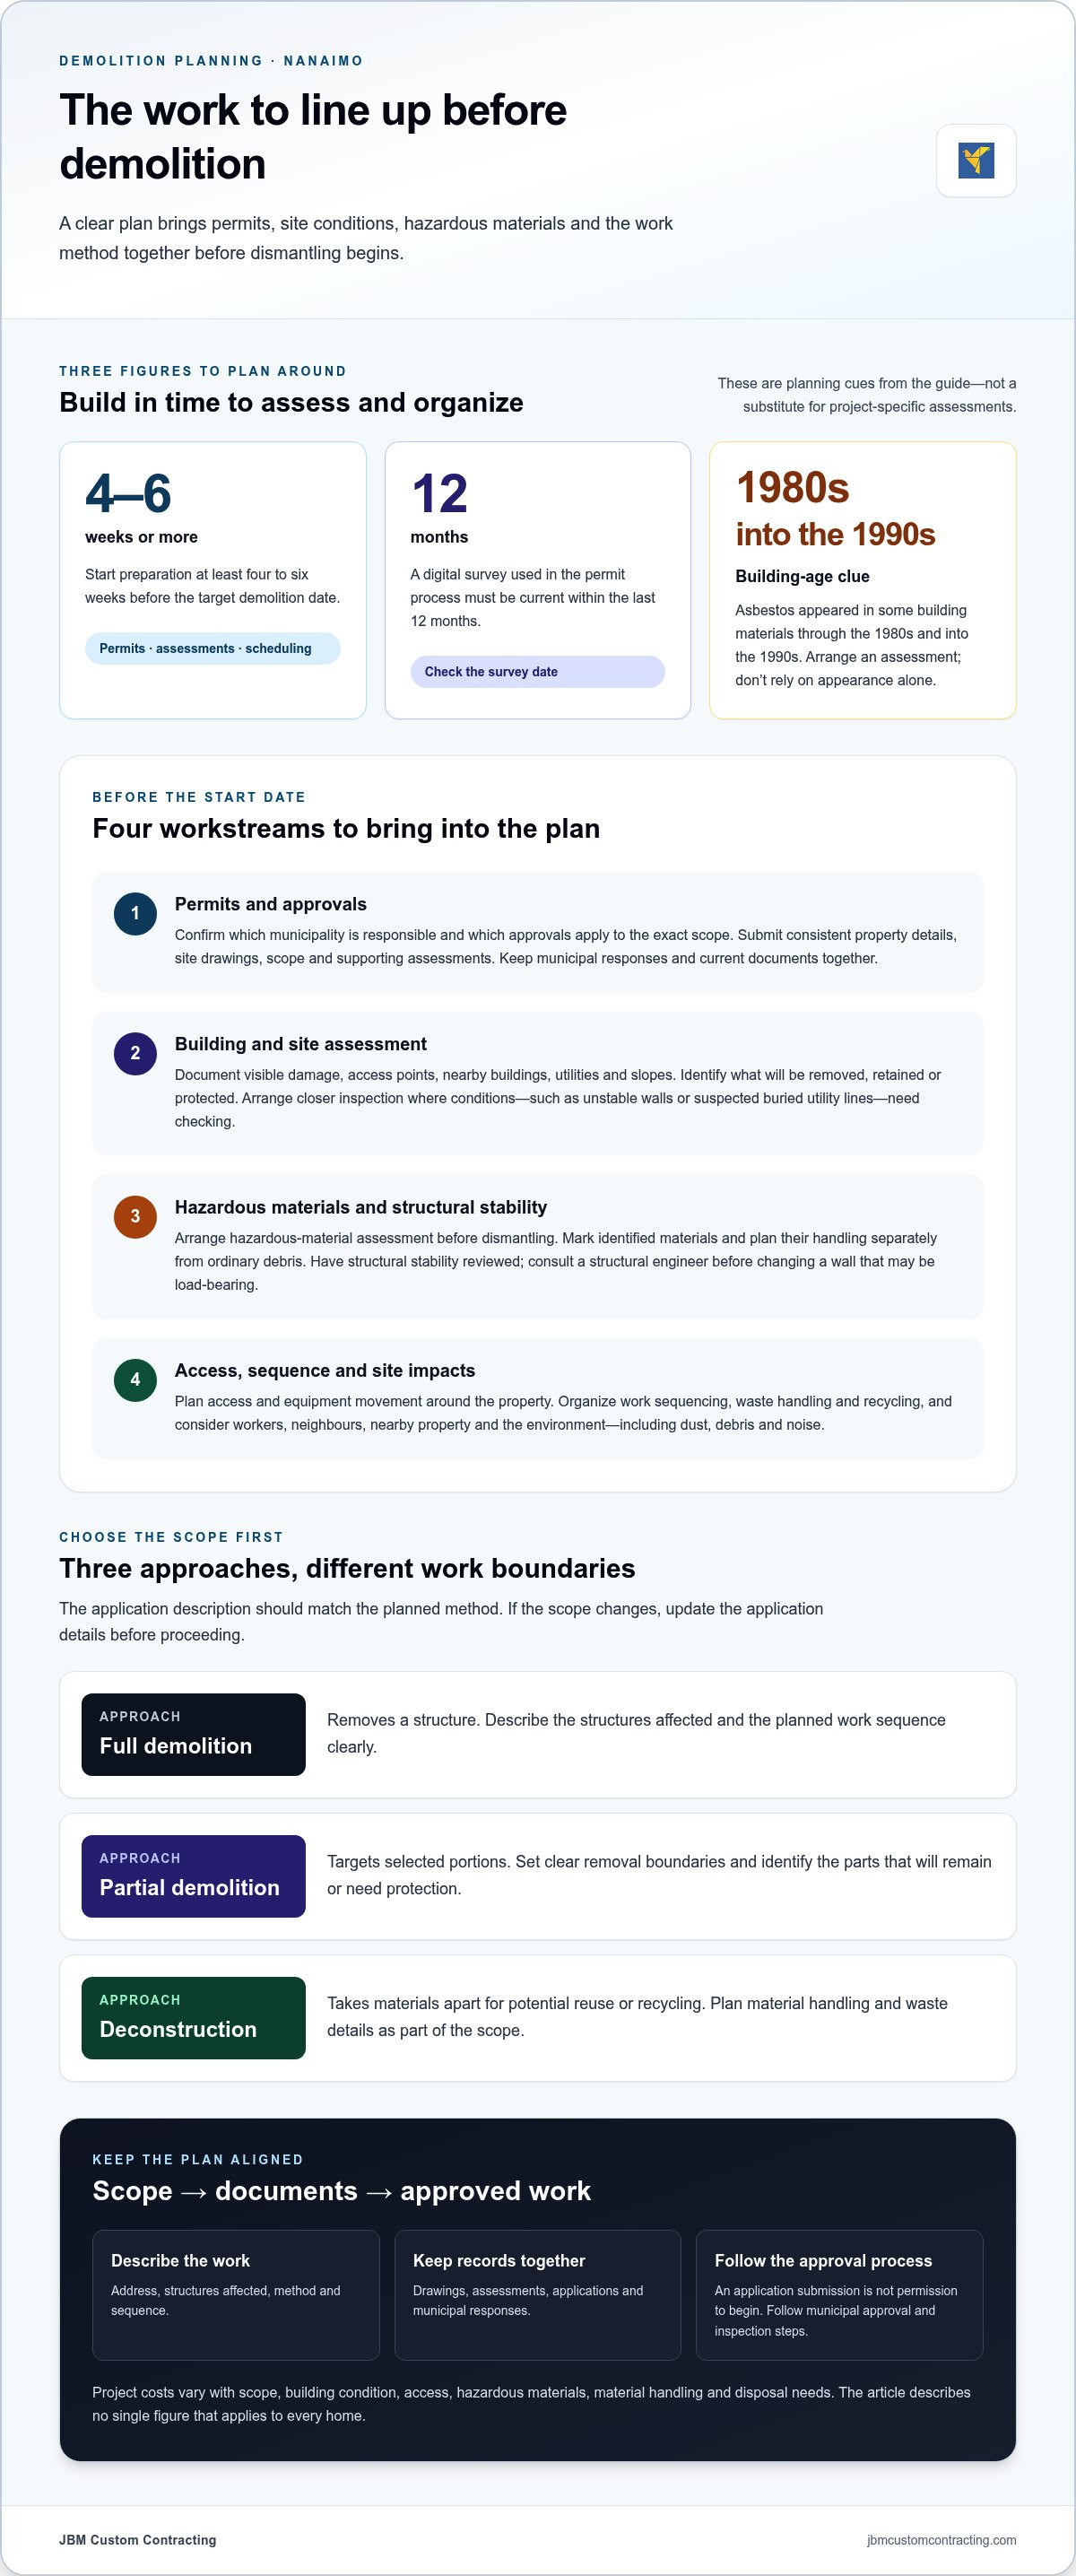
The demolition itself is only one part of a safe project. Careful demolition planning and preparation means arranging permits and approvals, assessing the building and site, planning access, and dealing with hazardous materials before dismantling begins. Start preparation at least four to six weeks before the target demolition date to leave time to organize the work.
It’s easy to focus on the structure coming down, but the plan also needs to consider workers, neighbours, nearby property, and the environment. Dust, debris, noise, utilities, and waste handling all affect how the work should be organized. The right approach depends on the building and its surroundings.
This guide explains how to prepare for a demolition project in Nanaimo, from permits and site access to hazardous-material removal, worker safety, and environmental protection. You’ll learn what to assess, what to arrange before work begins, and how to keep the project organized as it moves forward.
Key Takeaways
- Begin permit planning early and organize the documents, site assessments, and approvals the project requires.
- Assess building stability, hazardous materials, nearby structures, utilities, and site conditions before demolition starts.
- Plan site access, equipment movement, work sequencing, and setup around the specific property and project.
- Arrange hazardous-material removal before dismantling, and sort demolition waste for appropriate handling.
- Set clear worker-safety procedures and plan to limit dust, debris, and noise affecting neighbours and the environment.
Demolition permits and approvals
Start permit planning early in Nanaimo, because approvals can involve documentation and inspections. Treat demolition planning and preparation as part of the project schedule, not last-minute paperwork.
-
Check Permits and Local Regulations
Identify the municipality responsible for the property, then determine which approvals apply to the exact demolition scope. Full teardowns, partial removals, and deconstruction can involve different application details, so describe the proposed work clearly. Include the address, structures affected, and planned sequence. Don’t assume approval for renovations also covers demolition.
Build time for approvals into your schedule. The process may involve documentation and inspections, so gather application materials before setting a firm start date. Demolition planning and preparation should also account for assessment, waste handling, and recycling details required for the application.
-
Obtain Municipal Demolition Permits
Apply to the municipality with the documents required for its demolition process. Keep property details, site drawings, scope of work, and supporting assessments consistent across the application. If the municipality requests revisions or an inspection, record the item, responsible person, and next action. Start at least four to six weeks before the target demolition date.
A digital survey used in the demolition permit process must be current within the last 12 months. Check its date before including it, and arrange an updated survey if needed. Keep copies of submitted documents and municipal responses together, so the project team can follow the approved scope. This record supports demolition planning and preparation as the schedule develops.
- Compare the available work approaches before finalizing the application. Full demolition removes a structure, partial demolition targets selected portions, and deconstruction takes materials apart for potential reuse or recycling. Costs vary with the scope, building condition, access, material handling, and disposal needs. The work required and how materials must be handled are key cost factors.
How much does residential demolition cost in Canada? There’s no single figure for every home. The cost depends on the project and is set out in a written estimate after the scope and property details are reviewed. Factors include the structure’s size and condition, access, hazardous materials, and debris handling.
- Match the approval description to the chosen method. If the plan changes from removing one section to taking down the entire structure, update the application details before proceeding. Keep municipal correspondence with current drawings, assessment records, and the work sequence. This helps clarify what the approval covers.
For a Nanaimo demolition project, keep the scope and approval steps aligned with the planned work described under demolition project services. Don’t treat an application submission as permission to begin. Follow the municipality’s approval and inspection process before starting demolition.
What About Hazardous Materials in Nanaimo Buildings?
For a Nanaimo project, assess the building and surrounding site before choosing demolition methods. A clear assessment helps identify structural risks, hazardous materials, nearby structures, utilities, and site topography.
-
Conduct an Initial Site Assessment
Walk the property and document the structure, access points, visible damage, nearby buildings, utilities, and slopes. Compare those observations with the proposed scope so the plan reflects actual site conditions. Note areas that need closer inspection, such as cracked concrete, unstable walls, or suspected buried utility lines. This initial review guides further assessment.
Keep the scope specific: identify which parts will be removed, retained, or protected. A selective removal plan needs clear boundaries, especially where work will take place beside portions of the structure that remain. A defined scope also helps organize debris handling and prevents work from extending beyond the intended area.
-
Assess Hazardous Materials
Arrange a hazardous-material assessment before dismantling begins, and identify materials that need testing. Asbestos appeared in some building materials through the 1980s and into the 1990s, so a building’s age and renovation history can help guide the inspection. Include suspect insulation, finishes, and other materials in the assessment rather than relying on appearance alone.
Use assessment findings to plan how identified materials will be handled before work reaches affected areas. Mark locations and record the materials identified, so removal and ordinary debris handling can be kept separate. For example, have a suspect material assessed before workers disturb it or mix it with general debris.
-
Assess Structural Stability and Hazards
Arrange a structural inspection to understand how the building stands and which elements support it. Pay close attention to damaged framing, altered openings, and walls planned for removal. If a wall may be load-bearing, consult a structural engineer before changing it. The engineer can provide structural drawings for the project.
Plan the work sequence around the structure’s condition and support system. A wall that appears to be a partition may still affect stability, so don’t base the sequence on appearance alone. Include inspection findings in the scope, and revise the planned methods if the assessment identifies a stability concern.
-
Check Utilities and Surrounding Conditions
Locate utilities and assess nearby structures before work starts. A demolition investigation can include utility detection, reinforcement detection, material testing, and structural inspections. Note where services enter the building and where neighbouring structures sit close to the work area. These details help define safe work limits and inform equipment and removal methods.
Review site topography as part of the assessment. A slope can affect equipment movement and where debris collects, while tight boundaries can limit access to exterior walls. Record these conditions on the site plan so the sequence reflects the actual property rather than a generic layout.
-
Match the Scope to the Assessment
Compare assessment results with the written scope before finalizing the work methods. List the sections to remove, materials requiring separate handling, and areas to protect. For selective work, show the boundary between removal and retained areas clearly. A precise scope helps crews understand the intended work and keeps the plan consistent with site findings.
Use the assessment to define a practical demolition project scope, including concrete elements, structural concerns, and debris handling. If the findings change the planned sequence, revise the scope and drawings before that work proceeds. This creates a clear record connecting site conditions to the chosen methods.
How Do You Plan Site Access for Demolition?
Plan access around the building, equipment, neighbours, and work sequence. A site-specific layout helps crews move materials safely and keeps public areas clear.
-
Plan Site Access and Equipment
Walk the property and map the route from the street to each work area. Check gate width, overhead obstructions, ground condition, turning space, and nearby structures. Match equipment to the available route, not the other way around. A narrow driveway, for example, may limit where machinery can unload or turn.
Where the layout allows, mark separate routes for equipment, workers, and debris. Keep access clear of stored materials and identify a suitable loading area. If the site has soft ground or a steep approach, include those conditions in equipment planning before delivery.
-
Sequence Logistics and Set Up the Site
Set the work sequence before equipment or materials arrive. Show where crews begin, how debris moves out, and which areas remain active during each stage. For example, plan removal from the far side of a site toward the loading area, rather than sending workers through completed or active work zones.
Choose locations for sorting materials, temporary storage, and loading based on the site survey. Keep these areas clear of access routes and structures scheduled for removal. A considered setup reduces unnecessary equipment movement and supports efficient work. Adjust the layout if an inspection reveals obstacles or changing site conditions.
-
Establish the Site Perimeter and Public Safety
Mark the work boundary before removal begins, then identify entrances and nearby public routes. Use barriers and clear signs to direct people away from active work areas. Consider neighbouring buildings, sidewalks, driveways, and places where debris or dust could travel. Keep the boundary aligned with the actual work zone.
Review the perimeter as work progresses. If equipment moves to another side of the structure, update barriers and signs before that area becomes active. Assign someone to communicate changes to the crew, so workers and visitors follow the same site measures.
- Survey the building and surrounding site before finalizing the layout. Record property boundaries, slopes, access points, nearby structures, and visible utilities on the site plan. Compare that information with equipment routes and loading locations. If the plan conflicts with a site feature, revise the route before work starts.
Use the survey to decide what can be salvaged and where it can be separated from debris. Identify reusable materials before dismantling, then assign a protected holding area away from machinery. Keep salvage movement separate from debris removal to avoid mixing materials or blocking access.
- Plan the final site setup as part of the work sequence. After removal, clear remaining debris and identify areas that may need grading or concrete work. Keep the final review focused on the project scope, access routes, and intended site condition. Record any remaining work before equipment leaves.
Tailor these measures to the property and work method. A compact residential lot and an open commercial site need different routes, perimeter layouts, and loading arrangements. A sound plan reflects the actual site, follows applicable requirements, and organizes each task safely.
Hazardous-material removal
Address hazardous materials before dismantling reaches affected areas. A clear sequence helps protect workers and neighbours while keeping those materials separate from ordinary construction debris.
-
Investigate Building Condition and Hazardous Materials
Use the building condition survey to guide a focused investigation of hazardous materials. Record the structure’s condition, materials that need testing, and locations requiring closer inspection. Include concealed areas where planned work could disturb finishes or insulation. The survey should also note nearby structures and site conditions that could affect removal.
Connect each finding to a location on the building plan. For example, label a suspect material by room, floor, and surface rather than writing “insulation” alone. Clear records help the project team identify what needs assessment before dismantling and avoid mixing suspect materials with ordinary debris.
-
Identify and Remove Hazardous Materials
Arrange assessment of suspect materials before crews disturb them. Asbestos, lead, and mould require appropriate assessment and handling before affected areas are dismantled. Use the findings to identify affected areas, plan the work sequence, and keep identified materials separate from general construction waste.
Don’t treat a material’s appearance as proof of what it contains. For example, a painted surface or insulation may need assessment before removal. Record its location and handling plan, then arrange the work before demolition reaches that part of the structure.
- Set boundaries around the affected work area before removal starts. Mark access points and keep unrelated work away from identified materials. If an assessment finds suspect material in one room, define that room as a separate work area instead of allowing debris to move freely through the building.
Keep the planned sequence visible to everyone working on site. A marked plan can show which areas are cleared and which remain restricted. Update it when assessment findings change the scope, so crews don’t dismantle a section before its materials are addressed.
- Separate materials requiring special handling from reusable or ordinary debris at the point of removal. Use clearly identified containers or designated holding areas, and keep them apart from general construction materials. This helps prevent accidental mixing during loading and makes waste transfers easier to document.
Record what was removed, where it came from, and when it left the site. For example, track material from a specific room separately from debris generated elsewhere. Keep those records with the project file to document the movement from the building to disposal.
- Review the work area before moving to the next stage. Compare the marked plan with completed removal areas, and address any remaining suspect materials first. If debris or material is found outside the expected boundary, pause work in that area and arrange assessment before disturbing it.
Advance the work sequence only when the affected area is ready for the next task. Keep the survey, removal notes, and waste records together. This final review links the building assessment to the work completed and helps prevent hazardous materials from entering the surrounding site.
Worker safety and environmental protection
Build worker protection and environmental controls into the work sequence. Clear briefings, suitable protective equipment, exclusion zones, and waste sorting help crews manage risks and reduce effects on nearby properties.
-
Conduct Safety Briefings and Communicate
Hold a briefing before each work stage to explain the day’s tasks, hazards, and restricted areas. Review the sequence, utility locations, and communication methods so workers know how to report changing conditions. Use clear, direct instructions, especially when equipment moves or crews work in separate areas.
Include training and drills in the site safety plan. For example, explain how workers should respond if they find unexpected material or notice a change in structural condition. Repeat the briefing when the work area or sequence changes, and record key instructions so the whole crew receives consistent information.
-
Apply Worker and Public Safety Measures
Set exclusion zones around active demolition areas and keep access controlled. Provide workers with protective equipment suited to their assigned tasks, and make safety protocols easy to follow. Mark boundaries clearly so neighbours and visitors can distinguish public routes from restricted work areas.
Check that barriers remain in place as work progresses. If equipment or the active work zone shifts, update signs and exclusion zones before work continues there. Keep communication open between workers, supervisors, and those managing site access, so changes reach everyone affected.
- Plan controls for dust, debris, and noise before work starts. Identify where each could affect neighbouring properties, then choose practical ways to reduce the impact. For example, consider nearby homes when arranging work areas and debris movement. Review the controls as the work sequence changes.
Keep the environmental plan connected to daily operations. If dust or debris moves beyond the intended work area, pause and adjust the relevant control. A clear response process helps workers address the source instead of allowing the impact to spread across the site.
- Sort waste as it is generated. Separate recyclable materials from general debris, and keep materials requiring special handling apart for appropriate disposal. Mark each holding area and make sure workers know where different materials belong. This simple system reduces accidental mixing during loading and removal.
Record waste movements and keep relevant transfer information with the project records. Track materials from their work area to the designated holding or removal point. Check the site at the end of each work stage for loose debris that could affect workers, neighbours, or the environment.
- Review safety and environmental measures throughout the project, not only at the start. Check the work area, exclusion zones, equipment routes, and waste separation when the sequence changes. A new opening in the structure, for example, may alter where debris travels or where workers need protection.
Use inspections and crew communication to identify issues early. Assign responsibility for reporting hazards, updating the work plan, and informing affected workers of changes. This keeps protective measures practical and suited to site conditions, while helping limit dust, noise, and debris around the property.
Discuss your demolition project
JBM Custom Contracting: Renovations
JBM Custom Contracting provides Demolition Services for property owners preparing to remove a structure or part of one. Once permits, assessments, access, and safety measures are planned, demolition support can help move the project from preparation into the work itself.
For projects that combine removal with property improvements, JBM Custom Contracting also provides Renovations. Junk Removal can help clear unwanted items and debris as part of property clean-up. The right service depends on the work your site needs, whether that means selected small demolition and removal, renovation, or clearing material afterward.
For a demolition project in Nanaimo, explore demolition services as you plan the work. Contact JBM Custom Contracting to discuss your project.
Move Your Demolition Project Forward
Before setting a start date, bring your project decisions into one clear plan. Align the work scope, site conditions, and next steps so everyone involved understands what must happen before demolition begins. Strong demolition planning and preparation gives you a practical foundation for moving from early decisions to on-site work.
JBM Custom Contracting offers Demolition Services and Renovations for property projects, along with Moss & Gutter Cleaning. If demolition is the next step for your property, discuss the work and the outcome you want to achieve.
A well-organized project starts with a clear next step. Move forward with confidence and keep your property goals in view.
Frequently Asked Questions
What Goes Into Planning a Demolition Project?
A demolition plan brings the building, work sequence, and site logistics into one coordinated approach. It should identify what will be removed, what remains, how people and equipment move around the site, and how materials will be handled. For a Nanaimo property beside a busy driveway, for example, the plan should account for vehicle access and keep the work area separate from everyday access.
What Are the First Steps Before Demolition?
Start by defining the scope and surveying the building and property. Note which structures or sections are affected, what must stay, and any access or site constraints. Next, arrange the required assessments and identify approvals for the specific address. These early decisions help avoid planning equipment, waste handling, or work sequencing around assumptions that don’t match the property.
How Do Utility Disconnections Work?
Utility disconnection begins by identifying which services reach the building and where they enter the site. Include visible service lines and any known buried connections in the site information, then coordinate disconnection before work reaches those areas. The process depends on the utility and property. Record completed disconnections and communicate their status to the project team before work proceeds nearby.
How Far in Advance Should I Start Preparing for Demolition?
Start preparation at least four to six weeks before the target demolition date. That window gives you time to organize documentation, assessments, approvals, and site arrangements. Begin sooner if the building has complex access, requires additional investigation, or needs changes to the proposed scope. A useful first task is to list dependencies, such as approvals that must be received before equipment delivery or site setup.
Should You Salvage Materials Before Demolition?
Salvage materials before work when they can be removed safely and their recovery fits the scope. Identify reusable items during the building review, then plan how crews can remove and store them without disrupting the sequence. For example, keep salvage separate from general debris and choose a holding area that doesn’t block equipment routes. Structural safety and hazardous-material findings take priority over salvage.
What Are the Steps to Plan and Prepare for a Demolition Project in Canada?
Define the scope, assess the building and site, identify hazardous materials, plan utilities and access, and apply for approvals required for the property. Then organize the work sequence, worker protections, waste handling, and environmental controls. In Canada, permit processes and local requirements depend on the municipality and project details, so base the schedule on the property’s jurisdiction and proposed work.
What Demolition Permits and Approvals Are Required in Canada?
The approvals required depend on the municipality, property, and demolition scope. For a Nanaimo project, describe whether the work is a full removal or affects only part of a structure, then prepare the documents requested for that scope. A digital survey used in the permit process must be current within the last 12 months. Keep the approved scope and submitted materials together for the project team.
How Can Asbestos, Lead, and Other Hazardous Materials Be Identified and Removed Before Demolition?
Arrange assessment of suspect materials before dismantling disturbs them. An assessment identifies materials and locations requiring attention; appearance alone can’t reliably establish what a material contains. Use the findings to plan removal before work reaches those areas, and keep affected material separate from ordinary debris. Include the results in the work plan so crews can recognize restricted areas and follow the intended sequence.


