


A load-bearing wall can’t simply be knocked down: removing it typically involves temporary supports, followed by an engineered beam-and-post system to carry the load. Safe interior wall removal also starts with identifying the wall’s role and checking for hidden wiring, plumbing, gas lines and ducts before demolition begins.
It’s reasonable to want a more open layout without risking damage to your home. This guide explains how structural support is planned, why homes built before 1980 may need additional analysis, and how utility checks, dust control and protective equipment help make the work safer. You’ll also learn what happens during demolition and beam installation, and which project details affect the next steps in Nanaimo.
Key Takeaways
- Learn which clues can suggest a wall is load-bearing, and why appearance alone isn’t enough to determine its role.
- See how beam selection and the home’s structure shape a safe plan for opening up a space.
- Understand why temporary supports must be in place before the wall is removed and how the load is transferred.
- Know what to consider when checking for hidden wiring, plumbing, gas lines and HVAC ducts before demolition.
- Explore practical ways to limit dust and protect people and nearby areas during the work.
How do you remove a load-bearing wall?
Removing a load-bearing wall starts by determining what it supports and planning how that load will be carried. Safe interior wall removal also requires a structural assessment, utility checks, and attention to permit requirements before demolition begins.
Load-Bearing Wall Identification
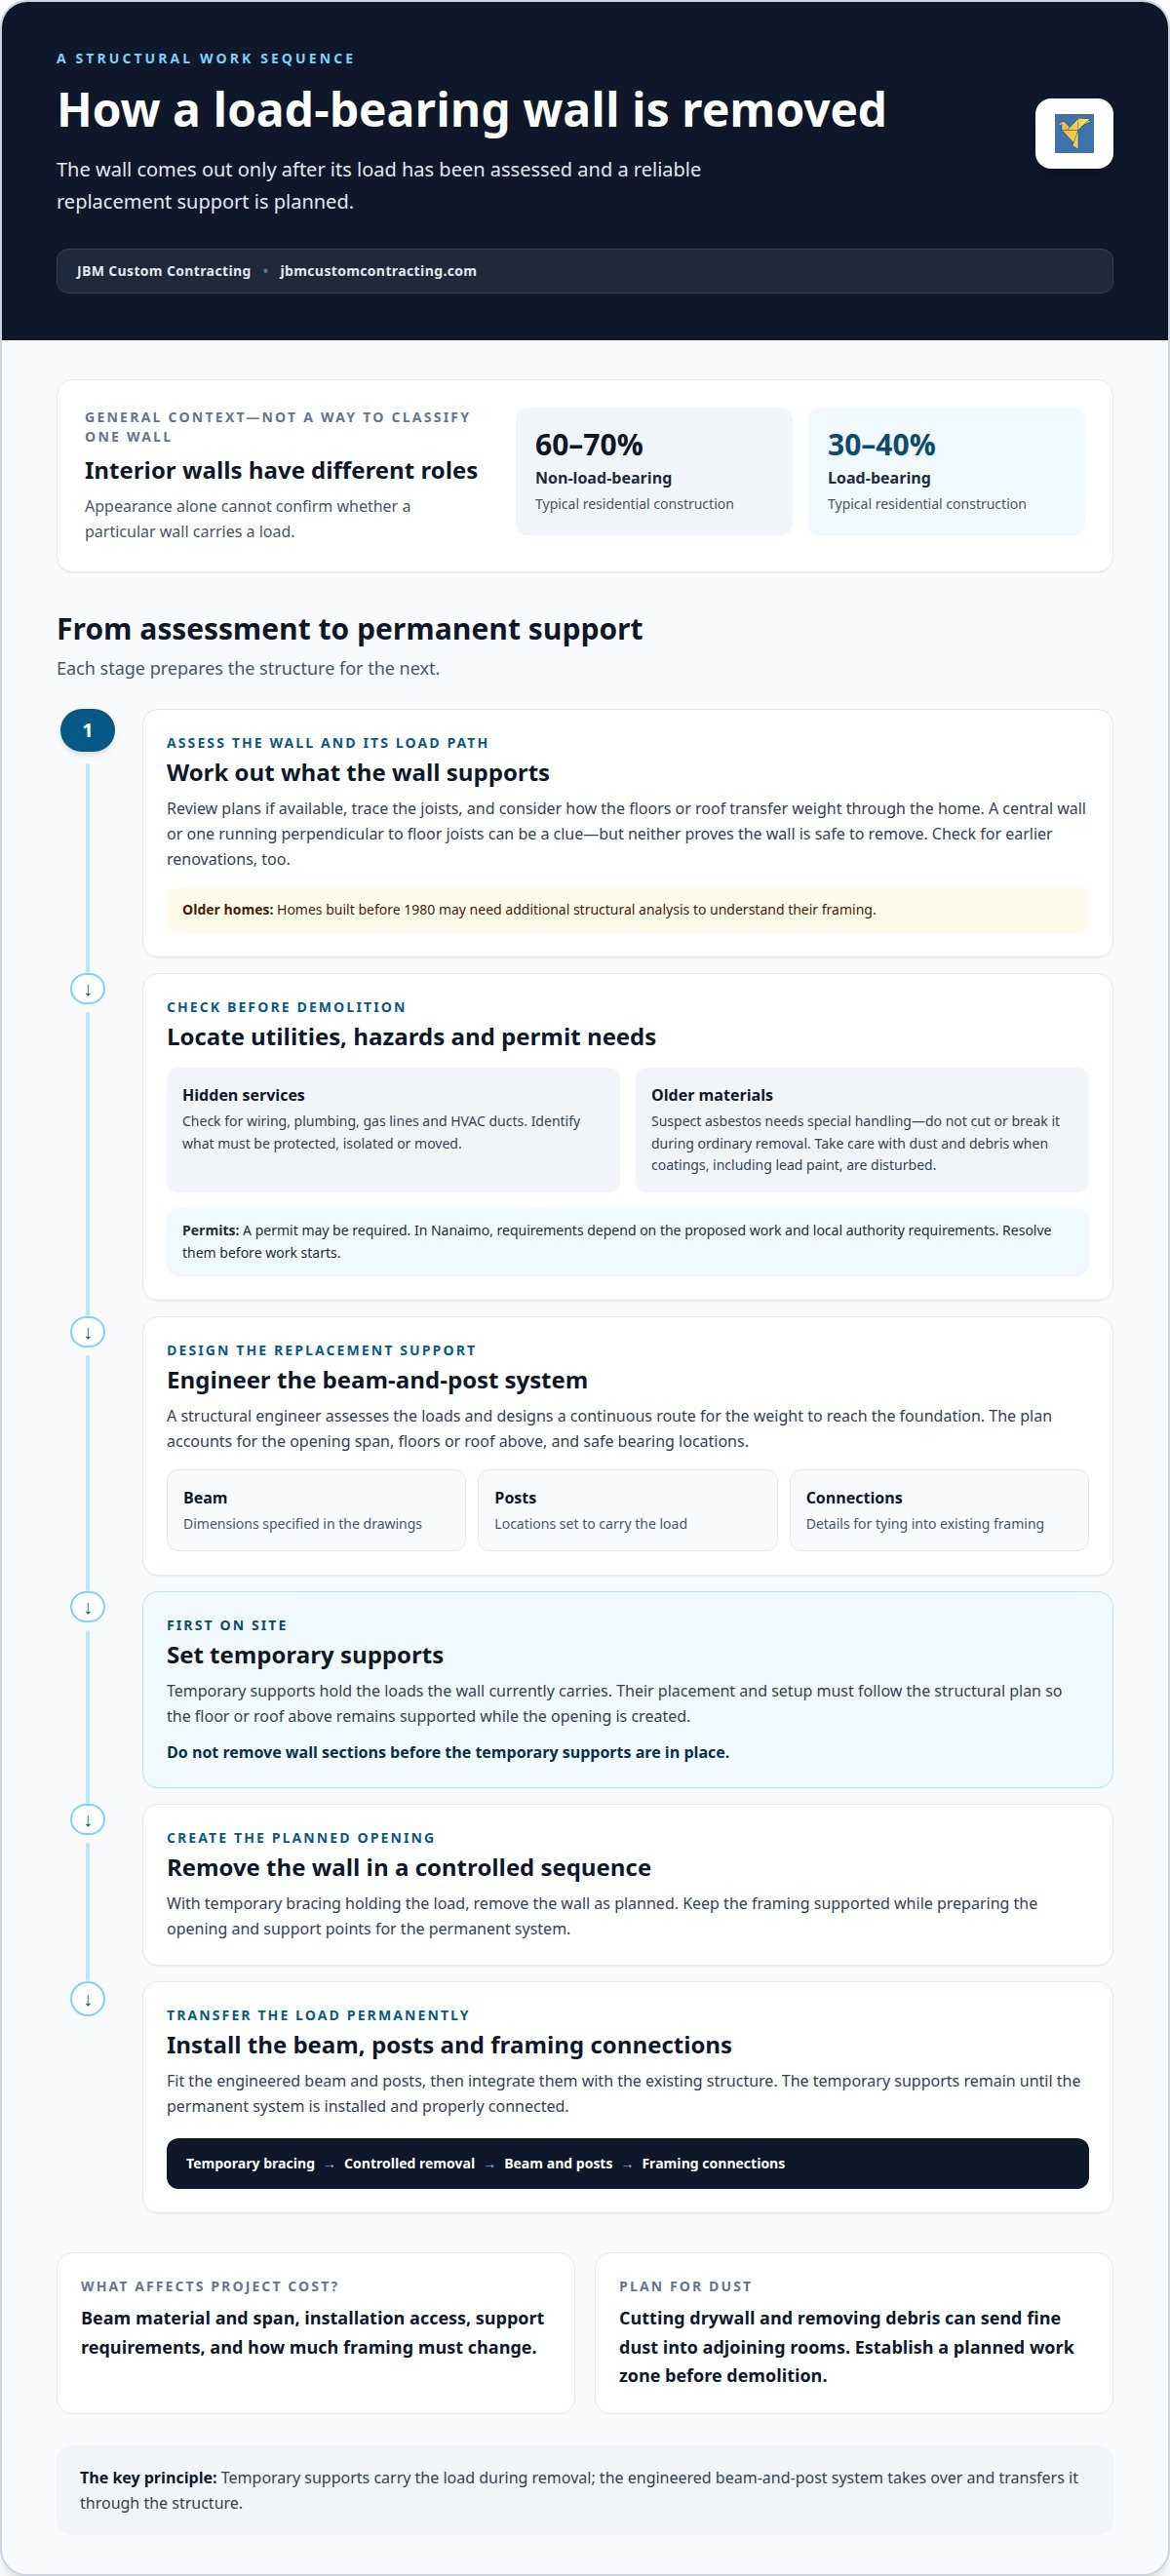
Load-bearing walls support floors, roof framing, or other parts of a home; partition walls mainly divide rooms. About 60-70% of interior walls in typical residential construction are non-load-bearing, while about 30-40% are load-bearing. These proportions provide general context, not a way to classify a particular wall.
Start with the construction plans, if available. A wall near the centre of a home and running perpendicular to floor joists may carry a load. A first-floor bearing wall often continues through the floors above. These clues can guide an assessment, but they do not prove that a wall is safe to remove.
Removal Assessments and Inspections
Before interior wall removal, assess the wall’s role and the framing above it. Trace the joists and consider how the home’s layout directs weight through its structure. Note signs of changes from earlier renovations. Homes built before 1980 may need additional structural analysis to understand their framing and plan modifications.
An assessment should also consider concealed wiring, plumbing, gas lines, and HVAC ducts. These checks help identify what must be protected, isolated, or moved before demolition. Removing a bearing wall without engineering input can leave floors or roof framing inadequately supported, causing movement or structural damage. The load path, opening size, and support points all matter.
Permits and Local Requirements
A permit may be required for load-bearing wall removal. In Nanaimo, applicable building-code provisions and local bylaws depend on the proposed work and local authority requirements. Structural changes, the building type, and affected systems can all influence the approval process.
Resolve permit requirements before work starts, not after the wall is opened. Plans for a structural change may need to show how loads will be supported and transferred. For separate exterior upkeep in Nanaimo, the Nanaimo house-washing service page describes a different property service and does not determine wall-removal approvals.
Asbestos, Lead, and Removal Risks
Older homes may contain asbestos in materials disturbed during demolition. If you encounter suspect material, do not cut or break it during ordinary wall removal. It requires special handling. Its location and condition can affect which materials are disturbed and how demolition is planned.
Lead paint can also affect preparation when painted surfaces are disturbed. Treat dust and debris cautiously, especially when the wall’s materials or coatings are uncertain. For safe interior wall removal, an engineer’s assessment helps establish how the building is supported and what replacement structure is needed. Without that planning, removing a bearing wall risks uncontrolled load transfer and damage to connected floors or framing.
Structural modifications and engineered beams
Replacing a load-bearing wall means creating a continuous route for its weight to reach the foundation. The beam, posts, temporary supports, and surrounding framing must work together.
Structural Assessments and Beam Installation
A structural engineer assesses the loads carried by the wall and the framing above it. The design accounts for the opening’s span, the floors or roof above, and where the new supports can bear safely. A beam-and-post system is a common engineered solution, but its size and layout depend on the home.
Installation involves preparing support points, fitting the beam and posts, and integrating them with the existing structure. Drawings specify beam dimensions, post locations, and connections, giving the construction team a clear plan to follow. In multi-storey homes, changes can place substantial pressure on the main floor, making engineering review particularly important.
Temporary Structural Support
Before demolition begins, temporary supports hold the loads the wall currently carries. Their placement and setup must match the structural plan, keeping the floor or roof above supported while the opening is created. Removing wall sections before supports are in place can leave framing without a reliable load path.
Once the wall is removed, the beam and posts take over its role. Temporary supports remain until the permanent system is installed and properly integrated. The sequence matters: temporary bracing, controlled removal, beam placement, and framing connections each prepare the structure for the next step.
Hire a structural engineer before removing a wall that carries a floor, roof, or other structural load. A contractor experienced in structural demolition can coordinate the work with the engineered design, but should not rely on guesswork instead of an assessment.
Structural drawings should explain how the proposed opening will be supported, not simply show the finished room. They can identify the beam and post arrangement, bearing points, and connections to existing framing. Clear details help the construction team follow the intended load path and reduce uncertainty during installation. In an older home, existing framing may need closer analysis before the design is finalized.
Project cost depends on the beam material and span, access for installation, support requirements, and how much framing must be changed. The price depends on the case and is given after a quote request; these structural details shape the scope.
With the design settled, work can proceed in a controlled sequence: set temporary supports, remove the wall as planned, install the engineered beam and posts, then integrate the new framing. Each step preserves support while transferring the load to the permanent structure.
Dust control and personal protective equipment
Cutting drywall and carrying out demolition can send fine dust into adjoining rooms. A planned work zone, protective equipment, and careful cleanup help contain it during a renovation.
Dust Control Measures
Before demolition, clear the work area and cover floors along the removal route. Close doors to nearby rooms and use plastic sheeting to separate the work zone from occupied spaces. Keep the barrier closed as materials move in and out. These steps help limit dust travelling through hallways and settling on furniture.
Turn off the HVAC system during demolition to reduce the chance of dust circulating through the home’s ductwork. Protect vents in the work zone from debris. Cut drywall in controlled sections rather than breaking large areas at once. Smaller pieces are easier to handle and can reduce the spread of loose material.
Personal Protective Equipment
Anyone entering the demolition area should wear a mask, safety glasses, and gloves. The mask helps limit dust inhalation, glasses shield eyes from particles, and gloves protect hands while handling broken drywall or framing. A contractor should keep this equipment on while cutting, carrying debris, and cleaning the work area.
Protective equipment works alongside containment, not instead of it. Keep people out of the work zone unless they are involved in the task and properly equipped. If demolition exposes material suspected of containing asbestos, stop disturbing it. Older homes may contain asbestos that requires special handling, so ordinary dust-control steps are not a substitute.
Protect nearby surfaces before using tools. Cover furniture that cannot be moved, and use floor coverings that stay in place along the route to the exit. Keep the path clear of loose offcuts, fasteners, and tools. A clear route reduces the chance of tracking dust or debris into clean rooms during removal.
Collect demolition debris as work progresses rather than leaving piles beside the opening. Place drywall and other loose waste in suitable containers, then carry it through the protected route. Avoid sweeping dry dust into the air. Use a HEPA-filter vacuum for cleanup, especially around floor edges, doorways, and other places where fine particles settle.
After the wall work ends, remove coverings carefully to keep trapped dust contained. Fold dusty plastic inward, and clean the work zone before removing the doorway barrier. Check adjacent floors, room thresholds, and nearby surfaces for residue. A final HEPA vacuum pass helps collect fine dust that ordinary sweeping can miss, leaving the renovated area ready for the next stage.
Identifying electrical, plumbing, gas, and HVAC utilities
Before demolition, identify utilities inside and behind the wall, not just the framing. Electrical wires, water or gas pipes, and HVAC ducts can change where and how crews open the wall.
A wall scanner can help locate live electrical wires, water pipes, gas pipes, and HVAC ducts or venting. Scan the planned opening area before cutting, then use the results to guide careful investigation. A scan is one part of the assessment, not a reason to assume the wall is clear. Utility routes can affect the work even when pipes or wiring are not visible from the room.
Compare scan results with accessible information about the home, such as renovation records or visible fixtures on both sides of the wall. A nearby sink, shower, or laundry connection can help identify where plumbing may run. Switches, outlets, and lights can indicate possible wiring routes. Vents and return-air grilles can point to ductwork continuing through the wall or ceiling.
- Electrical: Locate likely wiring routes around switches, outlets, and light fixtures before cutting drywall.
- Plumbing: Consider nearby taps, sinks, showers, and drains when tracing water lines.
- Gas: Include possible gas pipes in the scan and demolition plan.
- HVAC: Look for ducts or venting connected to nearby grilles and registers.
When a wall contains wiring or plumbing, remove drywall in controlled sections rather than striking it with a sledgehammer. A saw allows a careful opening, and removing the drywall piece by piece helps expose the work area gradually. This reduces the chance of damaging a concealed line before its location is understood. Keep cuts shallow until the wall’s contents are clear.
After hidden utilities have been checked, turn off the home’s power supply before working on a wall that contains wiring or plumbing. Shut off the water where plumbing is involved. These steps reduce the risk of electrical contact or water release during the work. If the scan or opening reveals an unexpected line, pause demolition and reassess its route before continuing.
Utility checks also affect the structural plan. A beam or post may need to occupy space near existing services, so their locations must be considered alongside the opening and load path. Moving a pipe, wire, or duct changes the work sequence and access required. The demolition plan should show where utilities remain, which areas need careful opening, and how the finished space will avoid blocking vents or service routes.
Clear utility mapping helps the crew make controlled cuts, protect the home’s systems, and plan debris removal. Recording exposed routes before covering the finished opening also gives future renovation work useful context.
Temporary supports and load transfer
Before opening a load-bearing wall, temporary supports must carry the weight above it. They hold the structure while demolition removes the wall and crews install the permanent beam-and-post system.
The support plan follows the building’s load path. Floor joists, upper floors, roof framing, and the wall itself show where weight travels. In a multi-storey home, changes on the main floor can affect the structure above. Temporary supports must account for those connected loads, not just the section of wall being removed.
Support placement and capacity depend on the structural design and existing conditions. A structural engineer’s drawings can identify intended support locations and how they relate to the beam, posts, and framing. The crew also needs to consider where the supports bear below. A weak or unsuitable bearing point can undermine the support plan, even if the temporary frame looks sturdy.
The work follows a deliberate sequence:
- Set temporary supports in the planned locations before removing the wall.
- Check that the supports are stable and bearing on suitable structure.
- Remove wall sections in a controlled sequence while keeping the framing supported.
- The beam and posts should be installed and integrated with the surrounding framing as part of the structural work.
- Remove temporary supports only after the permanent system is installed and integrated.
This sequence prevents an unsupported gap between the original wall and its replacement. For example, a beam cannot transfer the load safely until its posts and bearing points are in place. The temporary system remains active during that transition, supporting the joists or framing until the permanent structure takes over.
Keep the opening controlled during demolition. Removing the entire wall before supports are set can leave floor joists without the support they relied on. The planned removal sequence should match the drawings, including where the opening begins and how much wall is removed at each stage. If the framing differs from the assessment, pause and revise the plan before continuing.
After beam installation, the crew checks that posts and connections align with the design and that framing is integrated as intended. Only then can temporary supports be removed in a controlled manner. This final transfer matters: the new beam-and-post system must carry the load before the temporary structure comes down.
Structural support is no place for improvisation. A properly planned sequence connects temporary bracing, careful removal, and permanent beam installation into one continuous load-transfer process.
JBM Custom Contracting: RETAINING WALL CONSTRUCTION
JBM Custom Contracting provides Renovations and Demolition Services for property improvement projects. If your Nanaimo renovation involves removing an interior wall, the structural assessment and engineered design should guide the demolition sequence. This is especially important when the wall supports floors or roof framing, since temporary support and load transfer must be planned before removal begins.
Turn to JBM Custom Contracting when you’re planning demolition as part of a broader renovation. The team can help with the demolition work, while the project’s structural requirements determine the assessment and engineered plans needed for a load-bearing wall. Contact JBM Custom Contracting to discuss your renovation or demolition project.
Plan the opening with confidence
Turning an enclosed room into a more open space starts with a clear decision about how the change will work in your home. Before work begins, align the structural plan, project sequence, and renovation goals so the finished opening supports both the building and how you want to use the room. Safe interior wall removal depends on treating those choices as one coordinated project, not separate tasks.
JBM Custom Contracting offers renovations and demolition services for property improvement work. If you’re planning a wall change as part of a larger project, share the scope and your intended outcome to start a practical conversation about the work.
A well-planned renovation can make your home feel more connected while keeping the work focused and considered. When you are ready to shape the space, contact JBM Custom Contracting to discuss your project.
Frequently Asked Questions
How do I know if I need an LVL beam or a steel beam?
The structural design determines whether an LVL or steel beam suits the opening. The engineer considers the load, span, support locations, and available installation space. Steel beams generally cost more than engineered lumber, but cost alone does not determine the right material. The design drawings should identify the beam and show how it connects with posts and existing framing, giving the construction team a specific plan to follow.
How long does the permit process take for wall removal in Nanaimo?
Permit review time in Nanaimo depends on the project submission and the local authority’s review process. Structural changes may require supporting drawings that explain the proposed opening and load transfer. The application’s completeness and whether additional information is needed can affect the review. Include the permit process in project planning, and do not begin work requiring approval until the required approval is in place.
When Is It Safe to Demolish a Wall?
Demolition should begin only after the wall’s structural role, required approvals, hidden utilities, and work sequence have been addressed. For a load-bearing wall, the temporary support plan must be ready before removal starts. If demolition exposes an unexpected pipe, wire, or suspect hazardous material, stop and reassess before proceeding. This keeps the work aligned with the actual structure and contents of the wall.
Will removing a wall affect my home’s resale value?
Removing a wall may affect buyer appeal, but the outcome depends on the home, local market, and quality of the completed work. Some buyers value an open layout, while others prefer separate rooms or added privacy. Consider how the change will serve future occupants, not only how it looks. Keep project records, including approvals and structural documents where applicable, so the alteration can be clearly explained during a future sale.
How can I tell whether an interior wall is load-bearing?
Construction plans and surrounding framing can help indicate whether a wall carries weight. Note, for example, how joists meet the wall and whether framing or supports align above or below it. A wall’s thickness or position alone cannot confirm its role. If plans are unavailable or renovations have changed the layout, a structural assessment can clarify what the wall supports before any opening is made.
Do I need a building permit to remove an interior wall in Canada?
A permit may be required, particularly if the work changes structural support. Requirements depend on the local authority and project scope. Electrical or plumbing changes can also affect the approval process, even when a wall is not load-bearing. In Nanaimo, identify the applicable local requirements for the property and proposed work before demolition, and keep relevant approvals with the project records.
How much does it cost to remove a wall and install a structural beam in Canada?
Project pricing depends on the scope, opening span, beam material, post locations, access, and temporary support needs. Utility changes and repairs to floors or ceilings can also affect the work. JBM Custom Contracting prepares a written estimate after reviewing the property details, which may include a site visit. The estimate can itemize labour, materials, equipment, removal, disposal, and exclusions, so you can understand the proposed structural work and related finishing.


