


High-pressure washing can damage asphalt shingles, so a dramatic roof cleaning before and after shouldn’t come at the cost of the roof itself. A gentler treatment can address moss and algae without blasting the shingle surface. Algae streaks may clear quickly, while treated moss can take time to shrink and fall away naturally.
It’s understandable to expect every green patch to disappear as soon as the work is done. In practice, visible change can happen in stages: dark algae marks may fade first, while heavier moss remains as it dries and releases. The right approach also depends on the roofing material and the shingles’ condition.
This guide explains what moss and algae can change, what to look for in before-and-after results, and why pressure and treatment choices matter. You’ll also learn how careful roof cleaning can help avoid lifting shingles or driving water beneath them, and when a professional assessment makes sense.
Key Takeaways
- Avoid high-pressure washing on asphalt shingles; forceful water can loosen or damage them.
- Expect moss and algae to respond differently: dark algae streaks may clear quickly, while treated moss can take time to loosen and fall away.
- Watch for moss that holds moisture or creeps beneath shingles, as it can lift them and expose the roof to water infiltration.
- Choose roof treatments carefully and protect nearby plants, animals, and waterways from chemical runoff.
- Look beyond the immediate before-and-after appearance: the roof’s material, moss coverage, and treatment method all affect how results develop.
1. Pressure washing and harsh chemical precautions
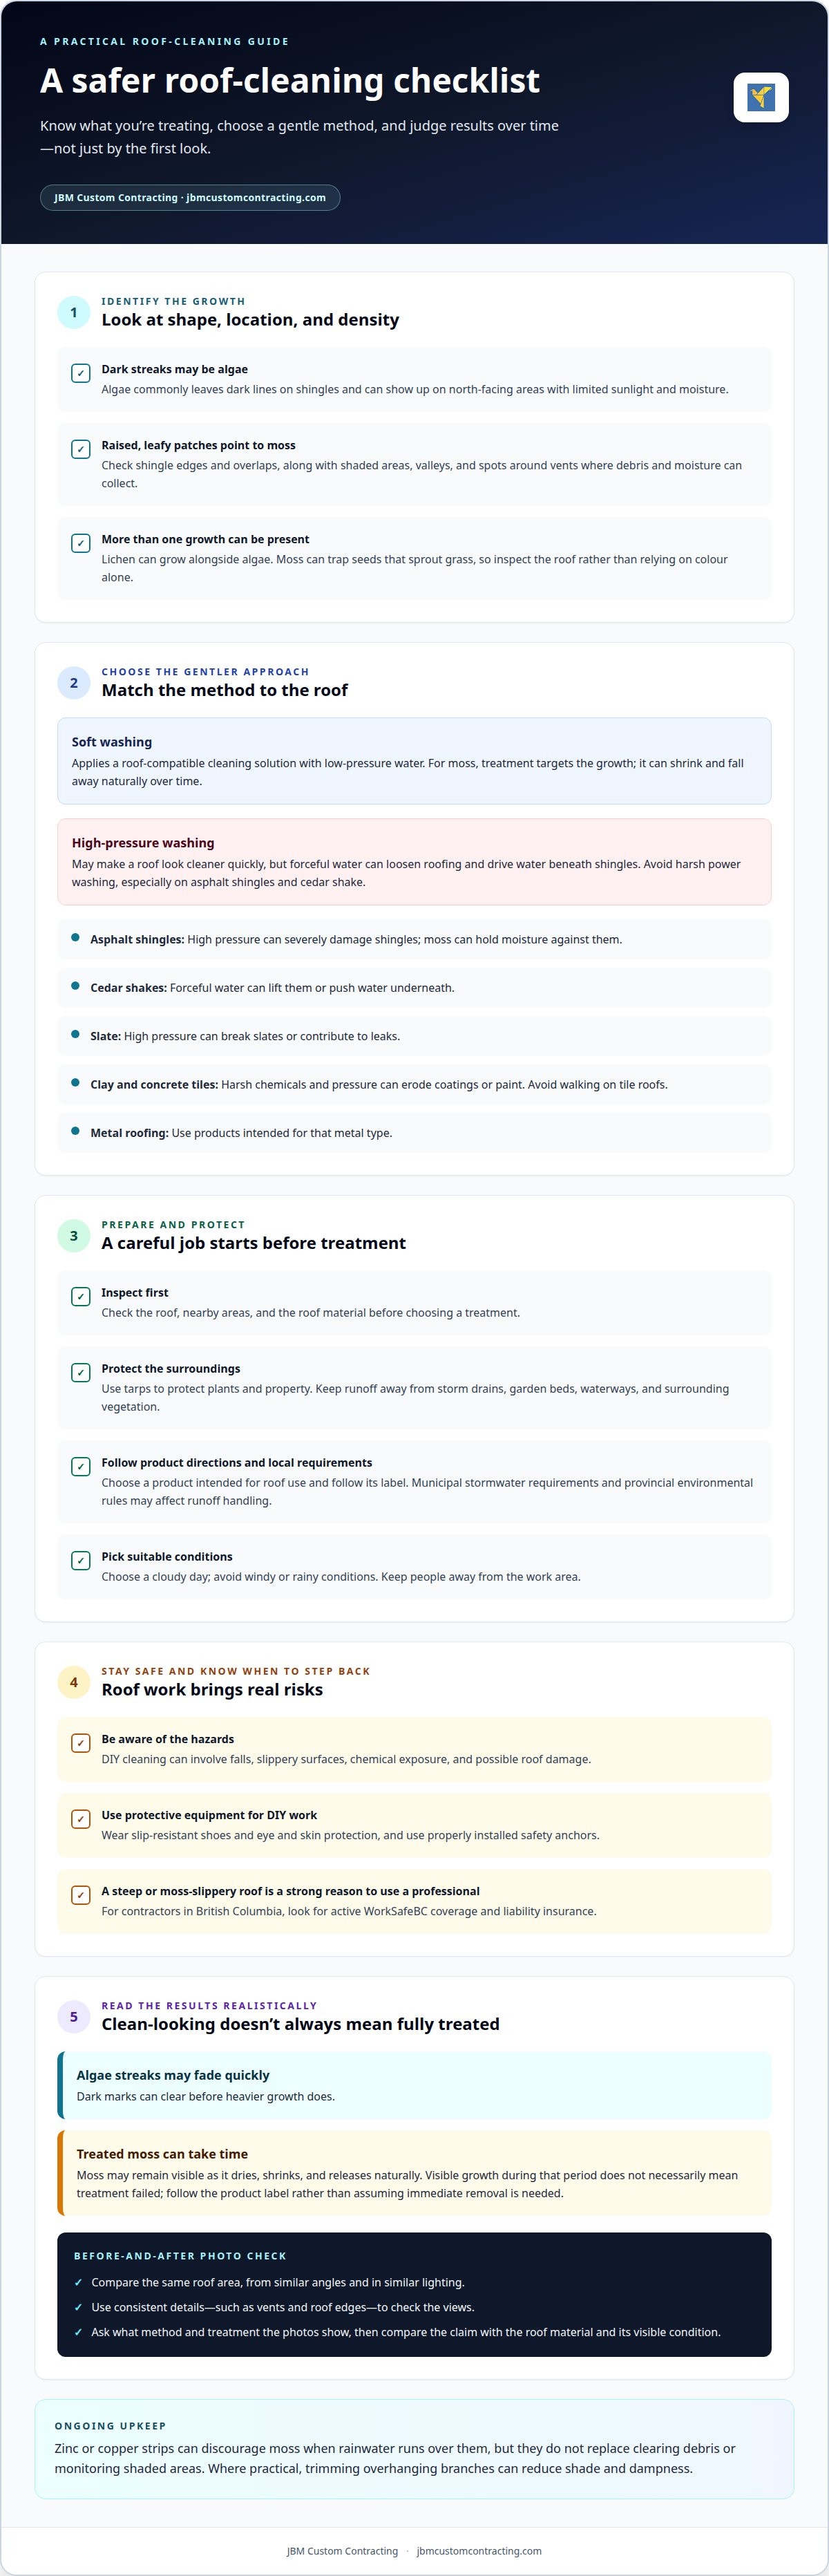
Soft washing applies a cleaning solution with low-pressure water, while pressure washing uses force to remove surface material. For moss treatment, a soft-wash spray targets the moss; the treated growth then shrinks and falls away naturally. High pressure may make a roof look cleaner quickly, but it can loosen roofing and drive water beneath shingles.
Roof material matters. High-pressure washing can severely damage asphalt shingles, and forceful water can lift cedar shakes or push water underneath. On slate, it can break slates or contribute to leaks. Harsh chemicals and pressure can also erode coatings or paint on clay and concrete tiles. For metal roofing, use products intended for that metal type.
Roof de-mossing is not the same as washing away all visible growth. Treatment addresses moss, while aggressive scrubbing or spraying can damage the roof surface. With heavy moss, visible pieces may remain while they dry and release. Avoid harsh power washing, especially on asphalt shingles and cedar shake.
Cleaning a roof yourself involves fall risks, slippery surfaces, chemical exposure, and possible roof damage. For DIY work, use slip-resistant shoes, eye and skin protection, and properly installed safety anchors. A steep roof or one made slippery by moss is a strong reason to use a professional. When choosing a contractor in British Columbia, look for active WorkSafeBC coverage and liability insurance.
Are there municipal or provincial rules for roof-cleaning runoff in Canada? Municipal stormwater requirements and provincial environmental rules may affect how wash water and chemicals can be handled. Protect storm drains and surrounding vegetation from runoff, and follow the applicable local requirements for the property.
Use a careful sequence: inspect the roof and nearby areas, protect plants and property with tarps, then apply a roof-compatible treatment at low pressure. Choose a cloudy day, and avoid windy or rainy conditions. Keep people away from the work area, and avoid walking on tile roofs. Pairing roof maintenance with gutter cleaning can also help clear debris from the drainage path.
To assess before-and-after photos and contractor claims, compare images of the same roof area taken from similar angles and in similar lighting. Look for consistent details, such as vents and roof edges. Ask what method and treatment the photos show, then compare those claims with the roof material and visible condition.
2. Moss, mould, mildew, and algae treatment
Identify the growth before choosing a treatment. Dark streaks on shingles are more likely to be algae than mould. Algae often appears on north-facing roof areas, where limited sunlight and moisture favour growth. Moss is easier to spot as raised, leafy patches. Lichen can grow alongside algae, so a roof may show more than one type of growth.
Look for differences across each roof slope. A narrow dark trail may suggest algae staining, while a thick green patch points to moss. Check around vents, valleys, and shaded sections, where debris and moisture can collect. These visual clues help describe the problem and identify areas that need careful attention.
Moss can also create conditions for other growth. It may trap seeds that sprout grass on a roof. Address moss before vegetation becomes established. Don’t judge the roof by colour alone; inspect the shape, location, and density of the growth.
Treatment should suit both the growth and the roof’s surroundings. Choose a product intended for roof use and follow its label directions. Eco-friendly roof treatments can help limit harm to roofing materials, nearby plants, animals, and waterways. Protect garden beds and keep runoff from spreading beyond the work area.
For prevention, zinc or copper strips can discourage moss when rainwater runs over them. They’re one part of upkeep, not a substitute for clearing debris or monitoring shaded areas. Where practical, trim overhanging branches to reduce shade and dampness, which can encourage moss.
Keep a simple record of the areas treated, the growth observed, and any nearby conditions. For example, note whether moss appears beneath a tree or lichen clusters beside a vent. These details make later inspections more focused. If roof treatment is part of broader exterior upkeep, JBM Custom Contracting’s property maintenance services can help address related property-care needs.
Treatment does not always leave a roof looking clean straight away. A soft-wash spray treatment targets moss, after which it takes time to shrink and fall away naturally. Visible growth during that period does not necessarily mean the treatment has failed. One forum participant described letting treated moss-covered asphalt roofs dry for a couple of days before rinsing. That is one person’s practice, not a universal timing rule, so follow the chosen product’s label directions when planning treatment and rinsing. Allow the treatment time to work rather than assuming immediate removal is necessary.
Black streaks can point to algae, which commonly creates dark lines on roof shingles and is more likely than mould to cause them. Algae can contribute to lichen formation, while moss can trap seeds that sprout grass on a roof, so different growths may appear together or in sequence. If moss is extensive, consider a professional cleaner, particularly if the roof is steep or slippery. Choose a treatment method that suits the roof surface, the growth, and the work involved.
3. Moss-related moisture and shingle damage
Moss can hold water against asphalt shingles and keep a roof damp after a sunny day. It forms a layer that slows drying beneath it, leaving the shingle surface exposed to moisture longer than nearby clear areas. Pay particular attention to dense patches where moss covers shingle edges and overlaps.
Moss can also creep beneath shingles and lift them. Once an edge rises, rainwater can travel beneath the shingle instead of flowing down the roof surface, increasing the risk of water infiltration. A lifted edge is different from a green surface stain, so note where the shingle line looks uneven.
Look for physical changes around moss growth. An edge that no longer sits flat, a visible gap between overlapping shingles, or a displaced shingle can signal a problem beyond surface appearance. Don’t pull at moss or lift a shingle to investigate, as this can disturb the roof and make the area harder to assess accurately.
Moisture inside the home can offer another clue. Check ceilings and attic areas beneath the affected roof slope for damp patches or water marks. For example, a ceiling mark below a moss-covered roof section deserves attention alongside the exterior condition. Water can travel, so the indoor mark may not be directly beneath the roof entry point.
Use a simple inspection routine from safe viewing points:
- Note where moss is thickest and which roof slope it covers.
- Look for raised edges or gaps around the affected shingles.
- Check ceilings and accessible attic areas below that slope for moisture signs.
- Record the location of each concern so it can be assessed accurately.
Separate routine maintenance observations from signs that may need repair. Surface moss calls for a cleaning decision, while lifted shingles or interior moisture point to a roof-condition concern. Cleaning alone won’t flatten a raised shingle or close an opening. If the roof has visible displacement, don’t treat it as a cosmetic issue.
For asphalt shingles, consider whether moss has changed how a shingle sits or sheds water. A clear roof may still have a lifted edge, and a mossy roof may show no obvious indoor damage. Assess both the exterior shingles and the areas beneath them for a fuller picture than colour alone can provide.
4. Asphalt shingle cleaning
Asphalt-shingle cleaning should protect the surface and edges. Before work begins, inspect the roof from the ground and note curled tabs, missing pieces, exposed areas, or uneven rows. Cleaning cannot correct existing wear. A clear record also helps distinguish pre-existing damage from changes noticed afterward.
Photograph each roof slope from a consistent position. Include fixed details such as a vent, chimney, or roof edge to make comparisons easier. Note where growth sits, especially around valleys and shaded sections. This baseline gives you a practical reference for reviewing the same areas after the work.
For asphalt shingles, avoid scraping, stiff-bristle scrubbing, or pulling at shingle edges. These actions can disturb the surface or shift a tab that was already loose. Use a treatment intended for asphalt roofing and follow the product label. Don’t assume a solution made for a driveway or concrete is suitable for shingles.
Preparation helps keep the work controlled. Move outdoor belongings away from the roof edge, protect nearby garden beds, and keep people clear of the area below. Check that the gutters can carry runoff. Note downspouts that empty beside plants or walkways so those areas can be protected during application.
Use this review sequence for a shingle roof:
- Record existing wear, loose tabs, and missing shingles.
- Photograph each slope with visible reference points.
- Protect items and landscaping beneath the work area.
- Apply only a roof-suitable product according to its directions.
- Compare the same photographed areas after the cleaning work.
During the final review, check more than colour. Compare shingle alignment, edges, and the roof around vents and valleys. If a tab looks newly displaced, compare it with the original photographs before deciding when the change occurred. This helps avoid mistaking an old defect for a cleaning-related change.
A careful asphalt-shingle cleaning plan focuses on treating the surface while preserving the roof. Product directions, existing wear, access, and runoff protection all shape the work. Keep before-and-after photos with your maintenance records, and note shingle changes that may need a separate roofing assessment. That record makes future inspections more useful and helps track the roof’s condition over time.
5. How long does roof cleaning take, and how long do results last?
Roof cleaning time depends on the roof’s size, pitch, material, access, and growth coverage. A small, gently sloped roof with light algae needs less work than a steep roof with thick moss. Setup matters too: protect the work area, attend to the gutters, and inspect the roof before treatment begins.
Ask what the cleaning process includes, not just how long spraying takes. A careful job accounts for preparation, treatment, runoff management, and a final review. For example, moss around vents and valleys needs more detailed application than an open roof slope. Rain or wind can also affect outdoor work and scheduling.
The visible result develops after treatment, rather than always appearing complete as soon as the work ends. Black algae streaks may clear naturally soon after treatment, while moss dries, shrinks, and releases over time. Most treated roofs may look great after 30 days, but heavy moss can remain visible longer as it separates from the surface.
Results can last longer when conditions that encourage regrowth are addressed. Overhanging branches create shade and drop debris, while damp roof sections give moss a foothold. Clear leaves from the roof and gutters, and trim branches that keep a slope shaded. These steps help reduce debris and moisture buildup between cleanings.
Use this simple follow-up plan:
- Take a clear photo before treatment from a consistent viewpoint.
- Review the same roof sections after treatment, including shaded areas.
- Allow treated moss time to dry and release before judging the final appearance.
- Keep gutters clear so leaves and roof debris don’t collect at the edges.
Plan maintenance around the roof’s exposure and growth. Annual maintenance helps stop moss from gaining a foothold, while roofing professionals recommend cleaning and inspecting roofs twice a year, ideally in spring and autumn. A north-facing slope beneath trees, for example, may need closer attention than a sunny, open slope. Pairing a roof inspection with gutter cleaning helps identify debris and drainage concerns together.
Compare photos over time, not only immediately after application. If algae returns or moss begins forming again, note the affected slope and nearby shade or debris. Those details help focus the next maintenance check on areas most likely to stay damp.
For a heavily moss-covered roof, a forum participant advised that it can take 90-120 days to become completely free of moss. Treat this as a possible waiting period, not a promise that every roof will follow the same timetable. During the wait, avoid judging the outcome solely by moss that remains attached, and keep the affected areas in view during routine checks. If substantial growth remains after that period, ask the contractor to review the treatment and explain whether further attention is appropriate. A clear record of the original coverage and subsequent changes can make that conversation more useful. The aim is to distinguish slow release from a treatment concern, rather than assuming that visible moss immediately means the work failed.
JBM Custom Contracting: Renovations
JBM Custom Contracting provides Moss & Gutter Cleaning for property owners dealing with roof growth and debris buildup. If cleaning reveals a separate property concern, Renovations may be a useful next step for broader improvement work. Choose the service that fits the issue: moss and clogged gutters call for maintenance, while renovation addresses a different project need.
Keep inspection findings, including photos of moss, blocked gutters, and visible changes. Clear notes help explain what needs attention and distinguish routine cleaning from other property work. JBM Custom Contracting also provides Demolition Services and Junk Removal when those services fit the project scope.
Contact JBM Custom Contracting to discuss your property needs.
Make your next roof-care decision with confidence
Let the roof’s condition guide what happens next. Keep a simple record of changes and maintenance needs, so future decisions reflect what your property needs rather than appearance alone. A roof cleaning before-and-after comparison can help you track changes and plan practical upkeep over time.
For moss and gutter maintenance, JBM Custom Contracting provides Moss & Gutter Cleaning. For projects beyond routine upkeep, the company also offers Renovations and Demolition Services. Choose the work that fits the issue, whether it’s roof maintenance or a separate improvement project.
A measured approach helps you move forward without rushing into unnecessary work. Keep your observations handy and choose the next step that supports your home’s upkeep.
With a clear plan, you can keep your property moving in the right direction.
Frequently Asked Questions
What does a roof look like before and after professional roof cleaning?
Before cleaning, a roof may show dark algae streaks, raised moss patches, or uneven green growth; afterward, algae marks may fade while moss remains visible as it dries and releases. A roof cleaning before-and-after comparison is clearest when photos show the same slope, roof edge, and nearby features in similar light. Look for changes in staining and growth, but also note any shingle edges that appear lifted.
Can roof cleaning damage shingles, tiles, gutters, or landscaping?
Yes. High pressure can loosen asphalt shingles, lift wood shakes, or break slate, while harsh chemicals can erode coatings on clay and concrete tiles. Runoff and spray may also affect gutters, garden beds, and nearby plants if they aren’t protected. Tarps can shield surrounding areas, and a treatment suited to the roof material helps reduce avoidable harm. For a steep or moss-slick roof, working from the ground is safer than climbing up.


